Today’s tutorial features a guide for building a CI/CD pipeline for Cloudflare Workers using Github Actions. Cloudflare Workers allows you to run Javascript in all 165 of their datacenters, and deploy globally in about 30 seconds.
Learn more here.
Introduction
In this tutorial, we will be exploring how to build a CI/CD pipeline that publishes to the Cloudflare workers every time we push new code to our Github branch. CI/CD is a set of practices that allow us to develop, test and deploy our code at high speed, all without sacrificing code quality or service availability. If you currently have a Github account, you might have heard of their CI/CD feature called Github actions which will be used in this example. Cloudflare is a web performance and security company that provides online services to protect and accelerate websites online. One of their offered services is called “Cloudflare workers”. Cloudflare Workers are modeled on the Service Workers available in modern web browsers, however and unlike standard Service Workers, Cloudflare Workers run on Cloudflare servers, not in the user’s browser.
Prerequisites
- Cloudflare account
- Wrangler CLI (https://developers.cloudflare.com/workers/tooling/wrangler)
- Github Account
- npm
Components (Summary)
The two main components involved in this article are a Wrangler configuration file and the Github Actions workflow.
- Wrangler configuration file. This is the wrangler.toml file which contains the information wrangler needs to connect to the Cloudflare Workers API, and publish your code. In general, Wrangler, aka Cloudflare Worker’s CLI tool allow us to create, build, and publish Cloudflare workers projects from the command-line.
- Github Actions workflow file. This is the .yml file stored in the .github/workflows directory in the root of your repository. It’s used to build, test, or deploy any project on GitHub.
Install Wrangler
The first step to do is to install Wrangler using the following command. This can be done on your local computer or on your cloud server.
$ npm i @cloudflare/wrangler -gNext, we need to use Wrangler to generate a new project for us with a new directory that we can navigate to, and install necessary dependencies for the CI system.
$ wrangler generate cf-worker
$ cd cf-worker
Configure Wrangler
To configure Wrangler, we simply need to edit the generated file wrangler.toml. The following file is the one we used in our test:
name = "cf-worker"
type = "javascript"
workers_dev = false
route = "www.domain.com/cf-worker"
The components of this file are:
The name field which will also be the name of our project or script.
The type field which tells wrangler build how to build our project. For now we are working with a NodeJS project so we picked Javascript as a type.
The workers_dev which is a true/false flag used to determine if our worker will be deployed to our workers.dev subdomain (if set to true), or to another custom domain that is served by CloudFlare. Since we used a custom domain in this example, we set this flag to false.
The route key will represent a path pattern your worker will be served at.
Github Actions
The next piece in our puzzle would be to add the Github workflow that will trigger the pipeline that will deploy our code to the Cloudflare worker. We will start by creating our workflow file which is a .yml file stored in this directory .github/workflows/cloudflare.yml.
Here’s the cloudflare.yml file we used for our workflow:
name: Cloudflare
on: [push]

jobs:
  build:
    runs-on: ubuntu-latest
    name: Deploy Cloudflare Worker
    steps:
      - uses: actions/[email protected]
      - name: install dependencies
        run: 'npm install'
      - name: deploy using wrangler
        run: 'npm i @cloudflare/wrangler g'
        run: 'wrangler publish'
        env:
          CF_ACCOUNT_ID: ${{secrets.CF_ACCOUNT_ID}}
          CF_ZONE_ID: ${{secrets.CF_ZONE_ID}}
          CF_API_TOKEN: ${{secrets.CF_API_TOKEN}}
The components of this file are described below:
name: name of our workflow
on : Github event that triggers the workflow. In our case, this would any push event on any branch in the repository. For the jobs, we only ran one job (called build) that was used to build and deploy our worker.
runs-on: This job runs on an ubuntu environment. It had several steps, one to install dependencies, then deploy using Wrangler.
env: The environment variables required for this deployment are basically used by Wrangler to correctly connect to the Cloudflare account as per the configured access permissions. The CF_ACCOUNT_ID field which is the ID of the Cloudflare account. The CF_ZONE_ID field which is the DNS zone of the used domain. You can find out how to retrieve these two here. Finally for the CF_API_TOKEN, you can generate one by following steps here. We will be adding these variables to our Github project under secrets in the next section.
Connecting it all together
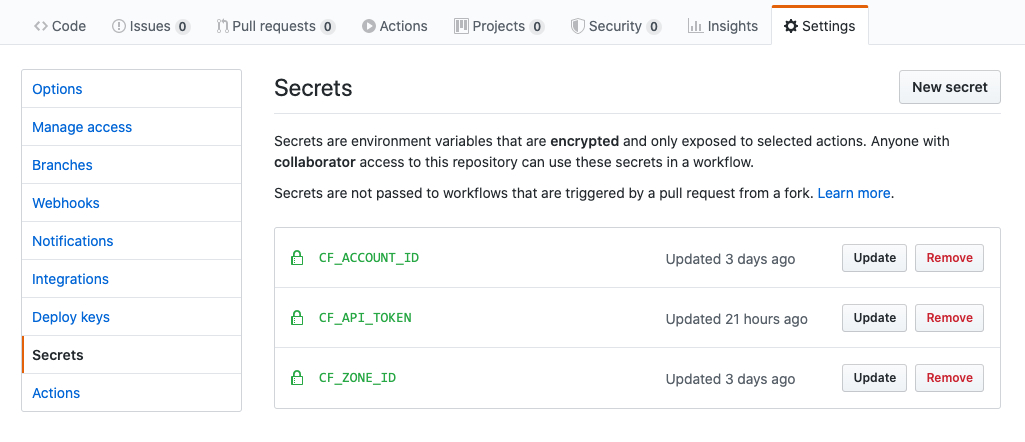
The last step to ensure our Github actions workflow can connect to Cloudflare would be to actually add the environment variables values as secrets on this project. As we have seen, Wrangler requires three environment variables to deploy a Cloudflare Worker, all of which can be created as GitHub secrets under the Github repository. You must have sufficient access privileges on your GitHub repository to create secrets. You can define a secret from your repository Settings, under the Secrets section.
Testing our Configuration
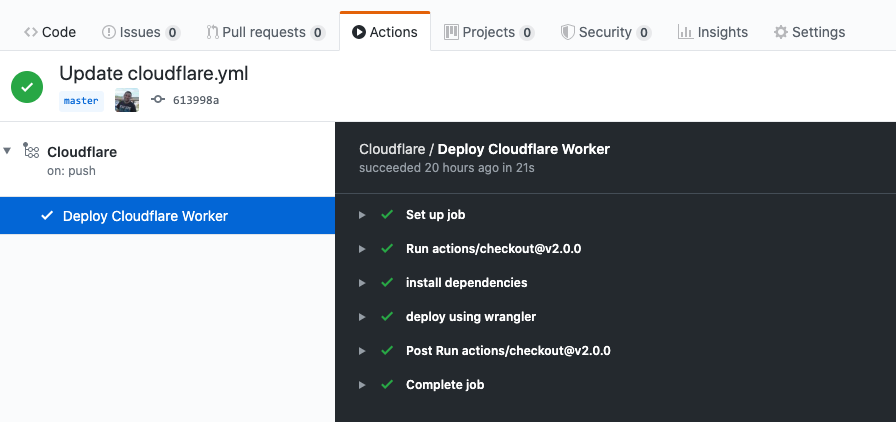
We can now simply add our code, and then push it to Github to trigger the workflow execution. GitHub Actions will automatically pick up the commit, execute the build steps and deploy our Cloudflare Worker.
About Github and Github Actions
- Marketplace, write your own in its own repository or use one defined in your current repository. In fact, Cloudflare has already created an action that can deploy to its workers using Wrangler. You can find it here.
- Define your workflows in yaml format.
- Can use actions available in the GitHub Action.
- Offers 4 types of virtual environments out of the box for the main operating systems:
- Windows Server 2019
- Ubuntu 18.04
- Ubuntu 16.04
- macOS Catalina 10.15.
Your Turn
It’s time for you to give it a try!
Feedback
Can we do better? We are always open to suggestions on fine tuning our process and widening out our subject matter – especially at the request of a fellow coder.