Now that we’ve seen how to deploy Cloudflare workers using Wrangler (Cloudflare’s own CLI tool), it’s time to explore how we can do the same using the well known Serverless framework. This post will describe how to setup a CI/CD pipeline to deploy a Cloudflare worker using Github Actions and Serverless. If you would like to see how we built the pipeline with Wrangler, you can review this post.
Would you like to learn more about Cloudflare Workers? Click here.

Introduction
In the previous four tutorials, we learned how to deploy a Cloudflare worker with different CI tools, all using Wrangler. Today, we will change the pipeline a little bit and use the Serverless framework instead of Wrangler. This post will cover how to deploy a CI/CD pipeline, that publishes to the Cloudflare workers every time we push new code to our Github master branch using Github Actions. Cloudflare is a web performance and security company that provides online services to protect and accelerate websites online. One of their offered services is called “Cloudflare workers”. Cloudflare Workers are modeled on the Service Workers available in modern web browsers, however and unlike standard Service Workers, Cloudflare Workers run on Cloudflare servers, not in the user’s browser.
Components (Summary)
The two main components involved in this article are a Serverless configuration file and the Github Actions configuration file.
- Serverless configuration file. This is the
serverless.ymlfile where we are declaring our service, the provider, the function and any other plugins that we would like to use. This is necessary to allow Serverless to communicate with Cloudflare and deploy the worker.
- Github Actions workflow file. This is the .yml file stored in the .github/workflows directory in the root of your repository. It’s used to build, test, or deploy any project on Github. In our example, we will call it
cloudflare.yml.
Install Serverless
Since we will be using the Serverless framework, we will need to install it using the following command. This can be done on your local computer or on your cloud server.
$ npm install serverlessNext, we will need to install another package called serverless-cloudflare-workers. This will be our provider plugin for Cloudflare.
$ npm install serverless-cloudflare-workersConfigure Serverless
To configure our Serverless setup, we simply need to create a file called serverless.yml in the root directory. The following file is the one we used in our test:
service:
  name: cf-workers
  config:
    accountId: ${env:CLOUDFLARE_ACCOUNT_ID}
    zoneId: ${env:CLOUDFLARE_ZONE_ID}

provider:
  name: cloudflare

plugins:
  - serverless-cloudflare-workers

functions:
  cf-workers:
    name: cf-workers
    script: index
    events:
      - http:
          url: www.domain.com/cf-worker
          method: GET
The components of this file are:
The service field which defines our serverless project. We also define our configuration with our Cloudflare account ID and Zone ID. You can retrieve these two values by following this guide.
The provider field which tells the serverless framework what cloud provider we are using, in this case Cloudflare.
The plugins field which helps us overwrite or extend the functionality of the Framework. In this case, we are declaring the package we installed a few minutes ago.
The functions key which will represent our Cloudflare Worker with its single script. As well as on which route to deploy the worker for a specific domain.
Right before we switch to configure Github Actions, we might as well create a new Hello World index.js file to be deployed to the Cloudflare worker.
addEventListener('fetch', event => {
  event.respondWith(handleEvent(event))
});

async function handleEvent(event) {
  return new Response('Hello cloudflare worker!', { status: 200 })
}
This is how our working directory structure should look like now:
.
├── .github
│   └── workflows
│       └── cloudflare.yml
├── index.js
├── package.json
└── serverless.yml
Configure Github Actions
The last step to configure would be the Github actions workflow. For that, we will need to create a .github/workflows/cloudflare.yml file. The name of the file could be anything as long as it’s stored within the same directory.
This is how our cloudflare.yml file looks like:
name: Cloudflare
on: [push]

jobs:
  build:
    runs-on: ubuntu-latest
    name: Deploy Cloudflare Worker
    steps:
      - uses: actions/[email protected]
      - name: install dependencies
        run: 'npm install'
      - name: deploy using sls
        run: 'npx sls deploy'
        env:
          CLOUDFLARE_ACCOUNT_ID: ${{secrets.CLOUDFLARE_ACCOUNT_ID}}
          CLOUDFLARE_ZONE_ID: ${{secrets.CLOUDFLARE_ZONE_ID}}
          CLOUDFLARE_AUTH_KEY: ${{secrets.CLOUDFLARE_AUTH_KEY}}
          CLOUDFLARE_AUTH_EMAIL: ${{secrets.CLOUDFLARE_AUTH_EMAIL}}
The components of this file are described below:
name: name of our workflow
on : Github event that triggers the workflow. In our case, this would any push event on any branch in the repository. For the jobs, we only ran one job (called build) that was used to build and deploy our worker.
runs-on: This job runs on an ubuntu environment. It had several steps, one to install dependencies, then deploy using Serverless.
env: The environment variables required for this deployment are basically used by Serverless to authenticate with the Cloudflare account as per the configured access permissions. The CLOUDFLARE_ACCOUNT_ID field which is the ID of the Cloudflare account. The CLOUDFLARE_ZONE_ID field which is the DNS zone of the used domain. We can find out how to retrieve these two here. We will also need to set our Global API key from Cloudflare as an environment variable named CLOUDFLARE_AUTH_KEY, and our Cloudflare account email as CLOUDFLARE_AUTH_EMAIL. We can get our Global API key from our Cloudflare profile page.
Connecting it all together
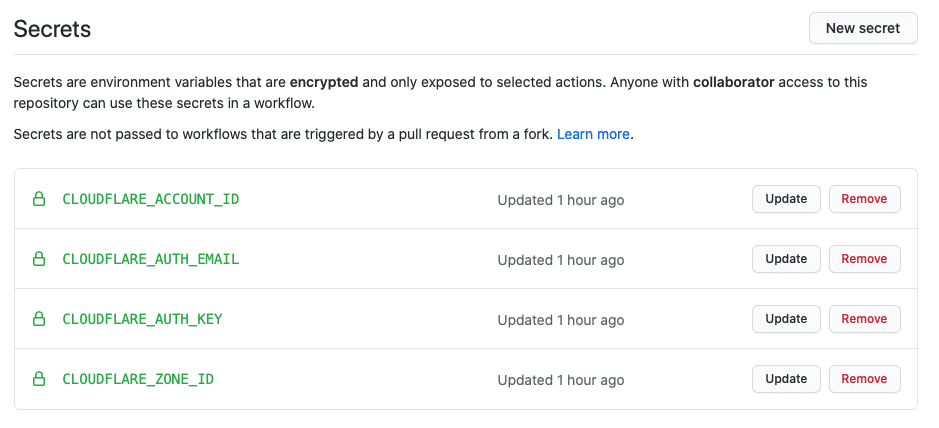
After configuring our Github Actions workflow in cloudflare.yml file, and right before we test our configuration, we still need to configure the required environment variables in our Github repository so that the we can successfully connect to Cloudflare to deploy our worker. To add them, we need to go to our project’s Settings and click on Secrets from the left side menu. Next, we need to click on New Secret, and fill in the details for the following environment variables:
CLOUDFLARE_ACCOUNT_ID: your Cloudflare account ID
CLOUDFLARE_ZONE_ID: your Cloudflare Zone ID
CLOUDFLARE_AUTH_KEY: your Cloudflare global API key.
CLOUDFLARE_AUTH_EMAIL: your Cloudflare account email.
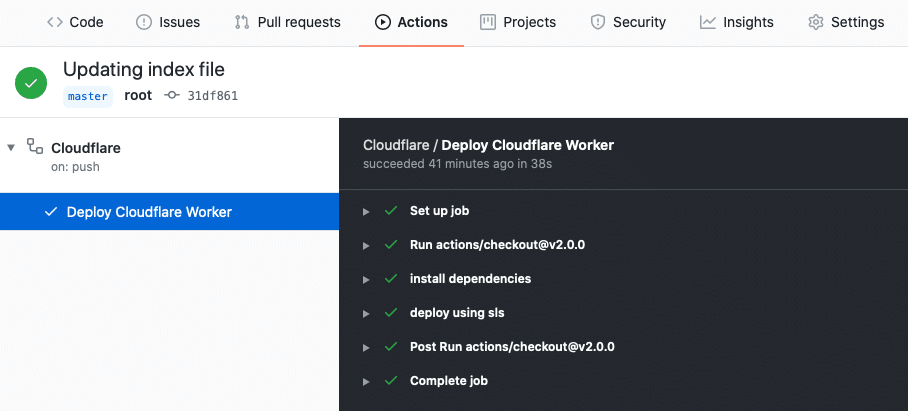
Testing our Configuration
Now that our environment variables are in place, the Github Actions job will call them and retrieve their values so that we can authenticate with Cloudflare while deploying the worker. To test that, we can now push our code to the Github repository and wait for the triggered Github Actions pipeline to finish executing.
About Github and Github Actions
- Marketplace, write your own in its own repository or use one defined in your current repository.
- Define your workflows in yaml format.
- Can use actions available in the GitHub Action.
- Offers 5 types of virtual environments out of the box for the main operating systems:
- Windows Server 2019
- Ubuntu 20.04
- Ubuntu 18.04
- Ubuntu 16.04
- macOS Catalina 10.15.
- You can get started with the documentation here
Your Turn
It’s time for you to give it a try!
You may also take a look at how we deployed a Cloudflare worker using other CI tools and Cloudflare Wrangler:
A Full CI/CD Pipeline for Cloudflare Workers with Github Actions
A Full CI/CD Pipeline for Cloudflare Workers with CircleCI
A Full CI/CD Pipeline for Cloudflare Workers with Travis CI
A Full CI/CD Pipeline for Cloudflare Workers with GitLab CI
Feedback
Can we do better? We are always open to suggestions on fine tuning our process and widening out our subject matter – especially at the request of a fellow coder.