In our previous post, we learned how we can deploy a Cloudflare worker using Serverless and Github Actions. Today, we will explore how to use Serverless framework with a different CI tool that we’ve used in the past and that’s CircleCI.
Would you like to learn more about Cloudflare Workers? Click here.

Introduction
As seen with Github Actions, we will explore how to deploy a Cloudflare worker using CircleCI this time, and the Serverless framework instead of Wrangler. This post will cover how to deploy a CI/CD pipeline, that publishes to the Cloudflare workers every time we push new code to our Github master branch using CircleCI. Cloudflare is a web performance and security company that provides online services to protect and accelerate websites online. One of their offered services is called “Cloudflare workers”. Cloudflare Workers are modeled on the Service Workers available in modern web browsers, however and unlike standard Service Workers, Cloudflare Workers run on Cloudflare servers, not in the user’s browser.
Components (Summary)
The two main components involved in this article are a serverless configuration file and the CircleCI configuration file.
- Serverless configuration file. This is the
serverless.ymlfile where we are declaring our service, the provider, the function and any other plugins that we would like to use. This is necessary to allow Serverless to communicate with Cloudflare and deploy the worker.
- CircleCI configuration file. This is the
config.ymlfile stored in the .circleci/ directory in the root directory of our repository. This file defines the entire pipeline of our CircleCI project.
Install Serverless
Since we will be using the Serverless framework, we will need to install it using the following command. This can be done on your local computer or on your cloud server.
$ npm install serverlessNext, we will need to install another package called serverless-cloudflare-workers. This will be our provider plugin for Cloudflare.
$ npm install serverless-cloudflare-workersConfigure Serverless
To configure our Serverless setup, we simply need to create a file called serverless.yml in the root directory. The following file is the one we used in our test:
service:
  name: cf-workers
  config:
    accountId: ${env:CLOUDFLARE_ACCOUNT_ID}
    zoneId: ${env:CLOUDFLARE_ZONE_ID}

provider:
  name: cloudflare

plugins:
  - serverless-cloudflare-workers

functions:
  cf-workers:
    name: cf-workers
    script: index
    events:
      - http:
          url: www.domain.com/cf-worker
          method: GET
The components of this file are:
The service field which defines our serverless project. We also define our configuration with our Cloudflare account ID and Zone ID. You can retrieve these two values by following this guide.
The provider field which tells the serverless framework what cloud provider we are using, in this case Cloudflare.
The plugins field which helps us overwrite or extend the functionality of the Framework. In this case, we are declaring the package we installed a few minutes ago.
The functions key which will represent our Cloudflare Worker with its single script. As well as on which route to deploy the worker for a specific domain.
Right before we switch to configure CircleCI, we might as well create a new Hello World index.js file to be deployed to the Cloudflare worker. We’ll store this file in the root directory of our repository.
addEventListener('fetch', event => {
  event.respondWith(handleEvent(event))
});

async function handleEvent(event) {
  return new Response('Hello cloudflare worker!', { status: 200 })
}
Configure CircleCI
Once we finished setting up Serverless, we need to start configuring our CircleCI job. Reminder, this will get triggered when we merge new code to our Github repo. So to get started, we will create a config.yml file and store it in a folder called .circleci at the root of our project.
This is how our config.yml file looks like:
version: 2.1
jobs:
  deploy:
    docker:
      - image: circleci/node:lts
    steps:
      - checkout
      - run: npm install
      - run: npx sls deploy
workflows:
  deploy:
    jobs:
      - deploy:
          context: cf-worker
The components of this file are described below:
version: This is the CircleCI platform version. 2.1 is the most recent version.
jobs : The jobs property that will list all the individual jobs within our workflow. In this example, we only have one which is deploy.
docker: This property indicates which docker image to use for the job. We will be using a prebuilt node image from CircleCI.
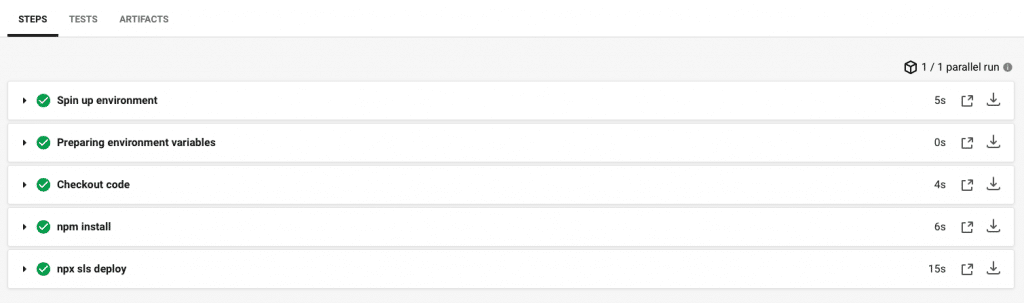
steps: The steps property is an ordered list of run directives that will execute in the same order in which they were declared. In our example, our first command is the checkout command, this will get us the branch code so that our subsequent steps can work with it. Next, we will install the dependencies and deploy the Cloudflare worker using the Serverless framework.
workflows: This property will allow us to manage how our defined jobs will run and what are their requirements. In this example, we will create a workflow named deploy that has one job also called deploy and that uses a context defined as cf-worker. A context will let us store environment variable as secrets and share them across CircleCI projects. More on the context feature shortly as we will need them to be able to connect to Cloudflare and deploy workers.
Connecting it all together
One last step before testing is to configure the required environment variables in a context inside our CircleCI organization settings so that the we can successfully connect to Cloudflare to deploy our worker. To setup a context, we need to head to our organization settings in CircleCI, in the Contexts panel click on Create Context and name it cf-worker. Next, we need to add the following environment variables:
CLOUDFLARE_ACCOUNT_ID: your Cloudflare account ID
CLOUDFLARE_ZONE_ID: your Cloudflare Zone ID
CLOUDFLARE_AUTH_KEY: your Cloudflare global API key.
CLOUDFLARE_AUTH_EMAIL: your Cloudflare account email.

For more infornation on CircleCI contexts, see here.
Testing our Configuration
We can now simply add our code, and then push it to Github to trigger the workflow execution. CircleCI will automatically pick up the commit, execute the build steps and deploy our Cloudflare Worker.
About CircleCI
- Cloud based system. But also offers an on-prem solution that allows you to run it in your private cloud.
- Offers a free plan.
- Define your workflows in yaml format.
- User friendly interface and extensive documentation.
- Docker images compatible with various programming languages:
- Python, PHP, Node.js, Ruby, Go (Golang), etc
- You can get started here
Your Turn
It’s time for you to give it a try!
See here how we deployed a Cloudflare worker using Github Actions and the Serverless framework:
Deploying Cloudflare Workers with Github Actions and Serverless Framework
You may also take a look at how we deployed a Cloudflare worker using other CI tools and Cloudflare Wrangler:
A Full CI/CD Pipeline for Cloudflare Workers with Github Actions
A Full CI/CD Pipeline for Cloudflare Workers with CircleCI
A Full CI/CD Pipeline for Cloudflare Workers with Travis CI
A Full CI/CD Pipeline for Cloudflare Workers with GitLab CI
Feedback
Can we do better? We are always open to suggestions on fine tuning our process and widening out our subject matter – especially at the request of a fellow coder.